Wednesday, May 8, 2013

Nail Design Part 2

This is my 'Nail Design' post part two--

You can scroll down to see my past post on my previous nail designs.  Here are the most recent nail designs I've done on my nails:


Late January 2013:


White gradation with silver holograms to give depth.  This design was very suitable for the month! Received numerous compliments--I'll probably do something similar again in this coming winter.


February 2013:


To go with the Valentine's Day theme, I decided to do pink glitter gradation with silver all glitter nails for my index finger and ring finger on both hands.  Very glittery!


March 2013:


Tried reverse French nails for the first time, and I think I like them! A lot of Japanese and Korean celebrities do reverse French nails--didn't think I'll like them, but I'll totally do it again in the future.  Light coral colored reverse French nails with small, gold stone on my ring finger on both hands.

Early April 2013:


I love this mint blue color, and although it's more of a summer color I couldn't resist it so I ended up getting it done on my nails in April.  I did solid mint blue (or Tiffany's color) on all my nails and added silver stone on some of my nails to create depth.  Glad I did this color because when I went back to the salon last week, it was no longer available! Hopefully, they'll have them again for the summer! I have a design in mind using this color...


Late April 2013:


Solid pink nails except my ring finger (gold glitter) and I decided to add star and solid stones on all my nails.  I'm not sure if I'll do the star again and can't say this was my favorite.


May 2013:


I was inspired to change up nail colors for each hand after seeing one of my favorite Korean actress having something similar done to her nails recently. For my right hand, all my nails are off-white except for my ring finger with a small heart drawn on it.  On my left hand, all my nails are purple-blue except for my ring finger which is white with big heart drawn in purple-blue.

 photo Christy.jpg


Tuesday, May 7, 2013

BaubleBar


Statement necklaces and stacked bracelets have been the top trends this season, and of course, I've been eyeing them.  As I've mentioned in my previous post, I'm not very adventurous; however, I don't like being "behind" in the new trends and fashion.  That doesn't mean I won't try to follow the trend nor will I spend crazy amount of money to follow a trend that might not last forever. I'm more of a "spend big on something that will last me a long time," and "spend minimum that'll last me a season" type a gal.

SO, I found a place where I can buy affordable and yet sophisticated and trendy necklaces, bracelets, earrings, and such for a reasonable price that's not going to cost me a leg and an arm.

Baublebar has been my new to-go online jewelry place! Omgosh, I love this site!

Reasons why I heart Baublebar:

1. New arrivals literally five times a week uploaded for consumers to buy! Something new to check out every day!

2. Reasonable priced-items! ($-$$)

3. There are stylists to assist and help you if you need to pair an outfit with a piece of jewelry or want to venture out a new style.  You can either visit their 1) NYC shop; 2) video chat; 3) email; or 4) call them for help.  If visiting NYC store, you'll need to set up an appointment with a stylist (free) who can help you!

4. Special $10 deal every Friday (one item "secretly" goes on sale for $10) and $20 deal every Monday.

5. Free shipping and free returns!!

6. Get rewards for spending money. Every dollar you spent will earn you a point, and once you reach 10 point you earn you a dollar credit which you can use towards your spending.

7. Many items are sometimes "sold out."  But don't be sad. You can be on a wait-list and they'll notify you via email once the item you want comes back in stock.

For example: I was looking for a nice gold chain necklace to go with one of my outfits, and ta-da, received an email today that the necklace came back in stock! I ended up purchasing it for $26!

Gold Chain Necklace


Check them out! :)  Happy shopping!
 photo Christy.jpg

Monday, May 6, 2013

Nail Designs


Nails, nails, nails!
One of my fetish is getting my nails done every month.  Yeah, I know it requires time and money to go and get myself pampered, but this is one time each month where I can relax and not worry about things.  I've been really "inspired" to try many new designs and such--been getting calgel nails since about a year and half ago. Biggest perk about living in NYC!

Although I think having 3-D design and doing crazy nails are fun, because of my profession and also my personality, I like to be different but not too overboard crazy.  Here are some nail designs I've done in the past:


September 2012

Image

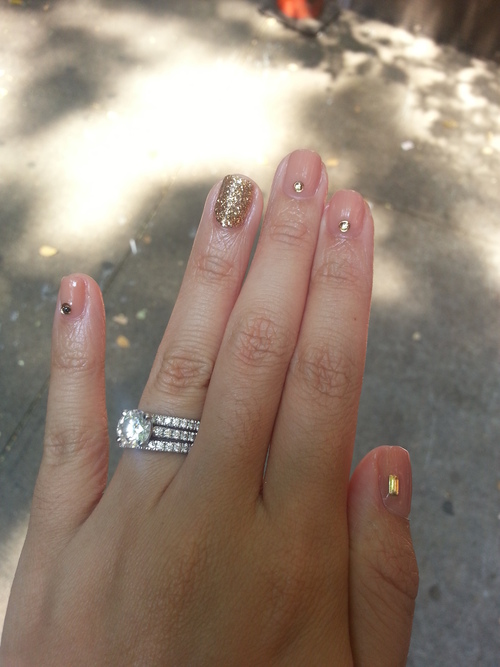
In preparation for the fall, this past September, I've decided to tone down the colors and go with the basic--nude nails! Of course, I needed to spark things up as I couldn't just have my nails in nude. I decided to place a focal point on my fourth/ring finger on both hands by painting them with glitter gold polish. To make my nude nails a bit more sophisticated, I decided to put tiny gold stone on each nail to create depth and design.


October 2012:


Image

I was inspired to try something a bit more unique with my nails when I was browsing through Japanese magazine a couple of months ago. I'm one of those people who have a hard time moving away from something I like and trying something new for the fear of not liking it and regretting the decision that I made. With my nails, I've been trying to keep them "simple" as I've been sticking with either getting: different colored french nails; glitter gradation; solid colored nails with little stones; or spicing up my nails by having my fourth or second nails different from the rest (more nail pix to come...).

When I saw and heard about "tie-dye" nails, I felt compelled to try it although I wasn't sure if I was going to be able to pull it off. Yay for my courage because I ended up really liking my October nails! In order to complement my tie-dye nail on my fourth finger, I decided to keep the rest of my nails simple by coloring them white--but of course, couldn't resist the little gems so added them to all my nails except the fourth one on each hand. The tie-dye nails were made up of 4 different colors: white as the base; light blue; hot pink; and yellow.


November 2012:


Image

I think it's been a while since I painted my nails in these dark shades of color. I'm one of those light nail colored person, always sticking with light pink and pastel colors. Since this past summer, I've been trying to be bold about my colors as I even attempted neon nail colors. I think living in NYC has definitely helped in bringing my boldness and my "I-don't-care-what-everything-else-thinks" attitude.

In order to make my nails a bit more unique than others, I've decided to alternate the dark gray (love this color!) and plum color as I paint them onto my nails. And of course, I couldn't leave out my precious stones/gems as I only added one on my thumb and pinky for both hands.


December 2012:

Image

I've been wanting to try the "half-moon" nails since last summer. I've been a little skeptical and wasn't sure if I would be able to pull them off (I'm such a "chicken" when it comes to trying new things, sigh!). My nail technician, Yuka, had convinced me in November, but ended up getting the dark colored shades instead--but had promised her that I'll try them in December.

I ended up spotting soooo many Korean celebrities with half moon nails on Korean TV shows and such all, which was a total plus! I guess the more you see others having it, the more you want it yourself--haha! I was debating between Christmas colored red but than decided to go with sparkly, copper gold glitter for this month.


January 2013:


I got my nails done to match the wintery month of January.

Image

Round nails with pure white polish with small, silver glitters for the gradation effect that starts near the cuticles. 

Image


 photo Christy.jpg

Sunday, May 5, 2013

Christy's Top 15 Beauty Favorites


Beauty and fashion has always been my interest ever since I was young. I am not a big risk-taker and have a hard time venturing out and trying new beauty and fashion trends. However, I DO improvise and cater various trends so that not only am I "in," but I work around to fit my personality---which brings me confidence and satisfaction. I am also not the type that want to bring a whole lot of attention to my attire and make up, but make it subtle and sophisticated at the same time.  Does this all make sense?
I wanted to take this time to share some of my beauty favorites that I cannot "live" without:

1.  Philosophy Purity Made Simple One-Step Facial Cleanser: This creamy formula melts away my makeup (even eye make up!) and clears pores while rosewood, sandalwood, and sage oils calm prickly, sensitive skin. It leaves my face refreshed and cleansed! I've been using this cleanser for the past 4 years, and will never go back to something else!
Image

2. Clarisonic Classic Sonic Skin Cleansing System: It was Oprah who really launched this oscillating facial cleanser into popularity. "It's a miracle massage for your face!" she said. The brush removes six times as much makeup and dirt as your hands alone, which not only clears pores but also makes skin-care products more effective. It has helped my skin tremendously, and I can definitely feel the difference in my skin if I skip a night not using my Clarisonic. This wonderfully pairs with Philosophy's Purity facial cleanser!
Image

3. Neutrogena Oil-Free Acne Wash Pink Grapefruit Facial Cleanser: If under a budget, omgosh, this is ONE of the best facial cleansers and it's a must-try product! It degunks pores with 2 percent salicylic acid and a zesty and yummy grapefruit scent. It also exfoliates! Love it!
Image

4. Nars Blush in Orgasm: This is a multi-year Allure magazine winner that gives a certain glow--the shimmery peachy pink looks good on everybody!
Image

5. Nars Lipstick in Schiap: This pink is named after a designer, Elsa Schiaparelli. This is one of the most desired, hottest color in town! I've had to go to 5 different Sephora stores to finally get my hands on this lipstick, goodness! Just putting on this lipstick will say it all, seriously!
Image


6. OPI Nail Lacquer in Lincoln Park After Dark: This is my to-go polish if I can't make up my mind. I usually get calgel nails, but when I am in the mood for this midnight-purple polish--you can spot them on my toenails! Great winter shade!

Image


7. TWEEZERMAN Slant Tweezer: These precision-slant tweezers never lose their edge. Since 1985, the company has provided unlimited sharpening to customers—meaning they'll last you a lifetime. My friend got me these, seriously, 6 years ago and it's going strong!
Image


8. Kiehl's Creamy Eye Treatment with Avocado: This eye cream brings a burst of hydratation and gently moisturizes the delicate eye area. Best during winter and spring time!

Image


9.  Laura Mercier's Tinted Moisturizer: A perfect mix of skincare and makeup that not only hydrates the skin but softens the fine lines with hint of color. Very lightweight with SPF 20 and best of all, it's non-comedogenic!

Image


10. Stilia's Stay All-Day Waterproof Liquid Eye Liner: One of the best waterproof liquid liner that will literally stay one all day AND night! It's very easy to apply, and the thin, marker-like tip will ensure precision. Totally recommend--even better than Bobbi Brown's Gel Eyeliner (seriously!).

Image


11. Make Up Forever's Aqua Eyes Pencil Eyeliner: Waterproof, smudge-proof eyeliner that I tend to use as both eyeliner and eye shadow. It is an extremely creamy formula and will glide on. You will NOT have to worry about not staying on all day as it is long, long, LONG-lasting!

Image


12. Shu Uemura's Eyelash Curler: This has long bed plate that ACTUALLY curls lashes (other curlers bend the lashes which will damage them). The BEST eyelash curler as I've used various other known kinds.

Image

13. Loccitane's Shea Butter Hand Cream: One of the bestselling hand creams and it definitely keeps my hands smooth and soft. My hands tend to be always dry, but this hand lotion moisturizes as the creamy substance penetrates quickly. It is NOT oily, phew!

Image


14.  Johnson & Johnson's Baby Lotion: I love this non-greasy lotion that is mild enough for delicate baby skin yet glides on perfectly onto adult skin. This lotion may not be suitable for those who have really dry skin and don't necessarily recommend it for winter-time use--however, this is my to-go body lotion for all seasons.

Image


15. Matrix Sleek Look Smoothing System Shampoo and Conditioner: THE best shampoo and conditioner for someone like me with thick, coarse Asian hair! It contains unique formulas that help transform my semi-wavy, thick, dry, coarse hair into smooth & sleek hair. My hair looks shiny and healthy, and I totally recommend it despite the steep price.

Image

 photo Christy.jpg

Blueberry Muffins

On Christmas morning, I decided to do a little baking for my husband. I wanted to try a new blueberry muffin recipe that I found on someone's blog, but with a little twist of my own. My husband and I devoured 2 muffins each this morning because it was DELICIOUS! Then, we had another one with our dinner as our "appetizer."  Definitely try it and let me know how it went!


Ingredients:
  • 3 cups of all-purpose flour
  • 3/4 cup of sugar
  • 1 1/2  tablespoon of baking powder
  • 3/4 teaspoon of salt
  • 2 large eggs at room temperature
  • 1 1/2 cups of buttermilk (Important: shake)
  • 6 tablespoons of unsalted butter, melted and cooled slightly (approximately 3/4 stick)
  • 1 1/2 teaspoons vanilla extract
  • 1 1/2 cups of blueberries, lightly coated with flour
  • 1 1/2 teaspoons of grated lemon zest

DIRECTIONS:

1. Preheat oven to 350 degrees.

2. Grease the 12-cups muffing tin or line with muffin liners.

Image

3. Wash the blueberries and pat dry on the paper towel. Lightly coat dried blueberries with 1-2 teaspoons of all-purpose flour. Set them aside.

Image

4. In a large bowl, sift and mix together the dry ingredients (flour, sugar, salt, and baking powder). Then make a well in the center. Set aside.

Image

Image

5. Melt unsalted butter (I placed the butter in the microwave for about a minute and had it sit to cool before mixing with the wet mixture).

Image

6. Stir in the liquid ingredients (beat the eggs first; then add buttermilk, melted butter, vanilla extract, and lemon zest) until just combined.

Image

7. Stir in the wet mixture into the well of the dry ingredients. Do not over-mix.

Image

Image

8. Gently and carefully fold the blueberries into the batter. The batter may be lumpy (it's okay!).

Image

9. Fill the batter to muffin cup right to the top using a large spoon or an ice cream scoop.

Image

Image

Image

10. Bake for about 20 -22 minutes until lightly golden OR a cake taster inserted in the center comes out with moist crumbs. It actually took me about 25 minutes but I think it's just with my oven. Do not over-bake the muffins!

Image

Image

Yummy!

 photo Christy.jpg

Mini Corn Dogs


Image

Corn dogs have always been one of my favorite snacks to eat growing up. As I grew older and started realizing how "bad" corn dogs could be, I started limiting my consumption. However, I recently found this awesome recipe and decided that I'll change things up so that I feel less guilty about eating them. Awesome and easy recipe, and it's definitely a recipe to try!

Ingredients:
  • 1 cup of yellow corn meal
  • 1 cup of all-purpose flour
  • 1/4 teaspoon of salt
  • 1/8 teaspoon of black pepper
  • 1/4 cup of sugar
  • 4 teaspoons of baking powder
  • 1 large egg
  • 1 cup of milk (I used skim milk but can use 1%/2%/whole based on your preference)
  • wooden skewers (shorter the better)
  • Canola oil for deep-frying the corn dogs
  • Beef franks (I used 98% fat free hot dogs)

Directions:

1. Pour enough canola oil in a deep-sauce pan and preheat the oil on low/medium heat so that it will be hot enough to start frying once you are done mixing the batter.

2. Steam the hot dogs (I used microwave to save time--about 30 seconds).

Image
3. Cut the hot dogs in half and inset the wooden skewers into the hot dog. Set them aside.

Image
4. In a medium bowl, mix the cornmeal, flour, sugar, salt, black pepper, and baking power together.

Image
cornmeal

Image
flour

Image
salt

Image
black pepper

Image
(I didn't have the 1 tsp spoon, so used 1/2 tsp spoon 4 times for the baking powder)

Image
sugar

5. Stir in the egg and milk into the dry mixture.
Image
milk

Image
egg

6. Stir the ingredients until it's well-mixed.

Image

7. Roll the hot dogs in batter until well coated.

Image

Image

8. Fry 2 or 3 corn dogs at a time until lightly browned, about 2-3 minutes. The batter makes about 24 corn dogs.

Yum! Like it??

Image


 photo Christy.jpg